
Imagine stepping into the Great Hall on a snowy Christmas Eve, the scent of warm spices and molasses swirling through the air as floating candles flicker overhead. Now picture bringing that same enchantment into your own home—not with magic wands, but with flour, sugar, and a bit of wizardly creativity. Building a Harry Potter gingerbread house transforms ordinary holiday baking into a spellbinding adventure, whether you’re recreating the majestic towers of Hogwarts Castle, the quirky, crooked charm of the Weasleys’ Burrow, or the cozy, thatched simplicity of Hagrid’s Hut.
As a longtime Harry Potter enthusiast and seasoned baker who has crafted dozens of themed gingerbread structures—from intricate Diagon Alley scenes to life-sized edible Hogwarts replicas—I’ve seen how these projects capture the imagination of fans young and old. They blend nostalgia for J.K. Rowling’s wizarding world with the hands-on joy of edible architecture. Yet many fans hesitate, worried about crumbling walls, frustrating collapses, or designs that don’t quite capture the magic.
This comprehensive guide solves those problems head-on. You’ll find a battle-tested structural gingerbread recipe, foolproof royal icing for strong “glue,” detailed step-by-step instructions, creative decorating ideas inspired by the books and films, and free printable templates (described for easy recreation or scaling). Whether you’re a beginner baker or an advanced cookie architect, this tutorial delivers a sturdy, show-stopping Harry Potter gingerbread house that stands tall, tastes delicious (if you dare nibble the scraps), and sparks wonder at every holiday gathering.
Why Build a Harry Potter Gingerbread House?
Creating a themed gingerbread house goes beyond a festive centerpiece—it’s a celebration of the wizarding world that brings families together. Harry Potter fans often seek ways to immerse themselves in the magic during holidays, and an edible recreation offers the perfect blend of creativity, storytelling, and skill-building.
The benefits are truly enchanting:
- Family Bonding and Tradition: Gather loved ones to pipe details, share laughs over wonky roofs, and debate which house color scheme wins (Gryffindor red and gold or Ravenclaw blue and bronze?).
- Unique Holiday Display: Unlike generic gingerbread houses, a Potter-themed one becomes an instant conversation starter—perfect for mantelpieces, party tables, or even as a thoughtful gift for fellow Muggles-turned-wizards.
- Skill Development: Hone baking precision, piping techniques, and structural engineering in a fun, low-stakes way.
- Nostalgic Immersion: Incorporate iconic elements like the Sorting Hat emblem, golden snitches, or floating candles to relive favorite scenes from the series.
In my experience crafting these over many holiday seasons, the real magic happens when the structure holds strong against gravity (and eager fingers) while evoking the wonder of Platform 9¾ or the Forbidden Forest. It’s edible art that captures the heart of the wizarding world.
Choosing Your Harry Potter Theme
The first step to success is selecting a design that matches your skill level, time, and vision. Each iconic location offers unique challenges and charms:
Classic Hogwarts Castle
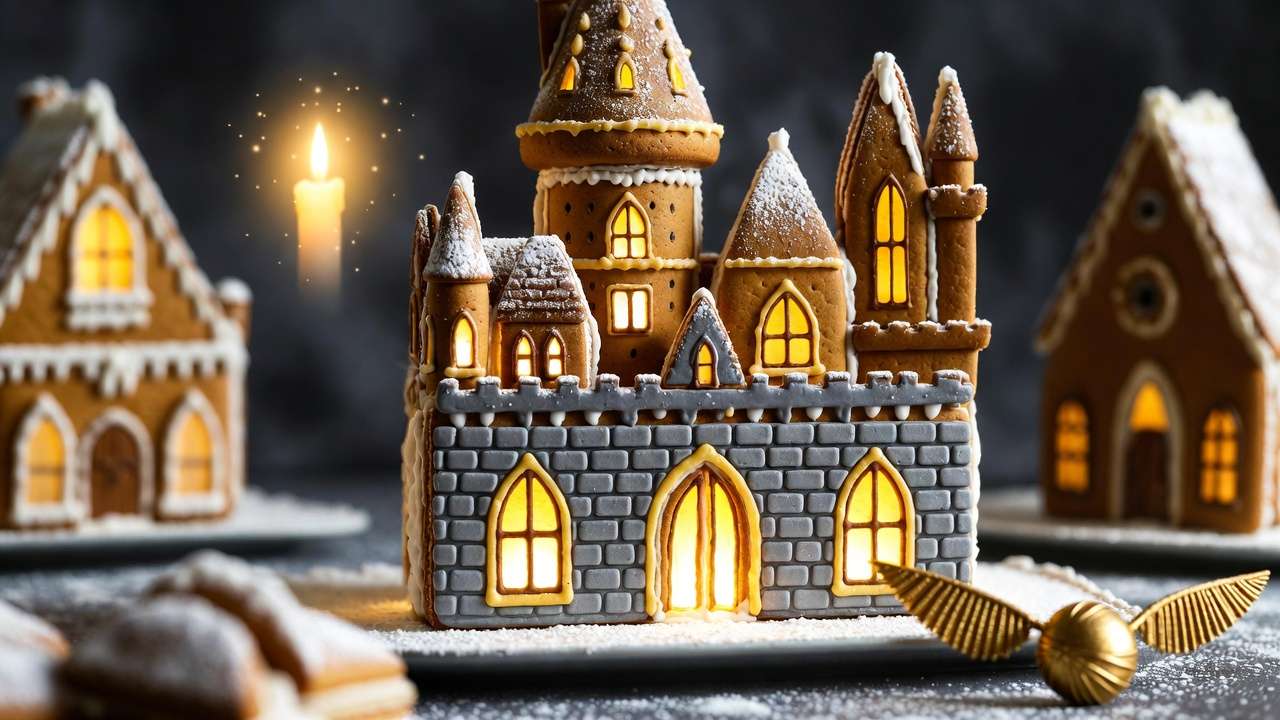
This grand design features multiple towers, arched windows, and a central Great Hall vibe. It’s ambitious—ideal for advanced builders with 2–3 days to dedicate. Pros: Impressive scale and detail potential. Cons: Requires precise cutting and strong assembly. Perfect if you want a showpiece that screams “Hogwarts School of Witchcraft and Wizardry.”
The Weasley Burrow
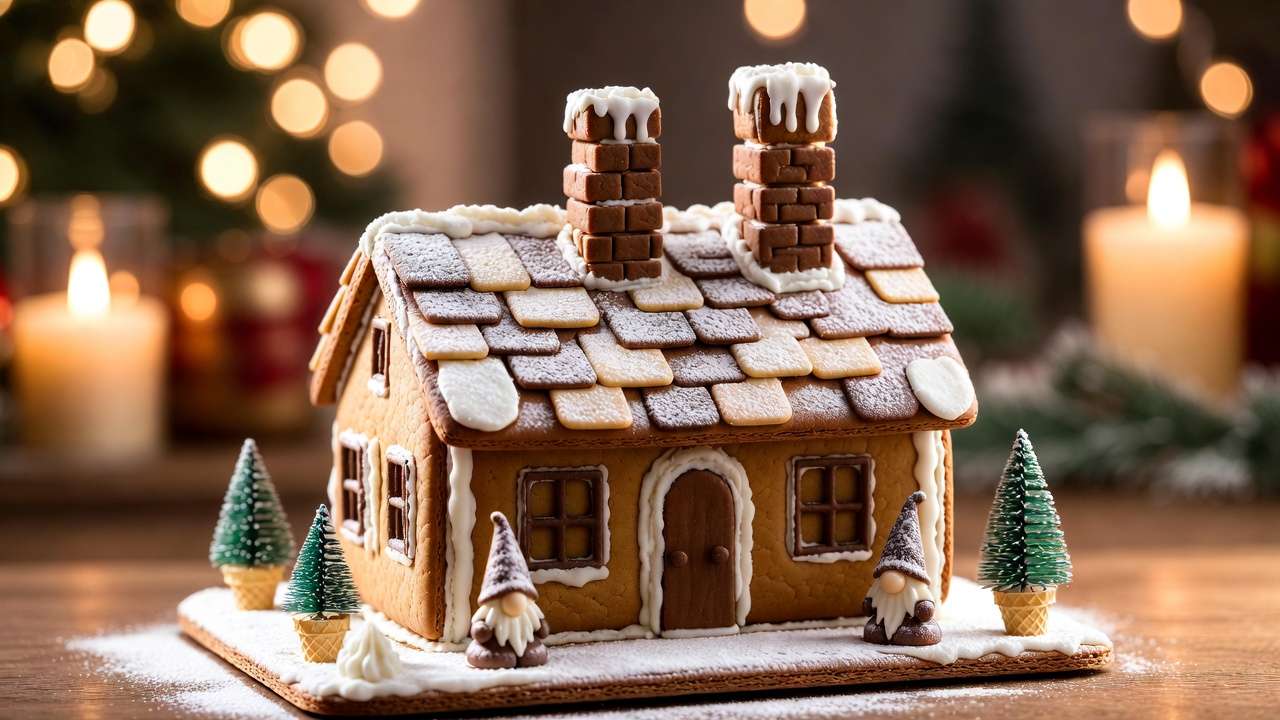
The crooked, layered, mismatched charm of the Weasleys’ home makes this forgiving for intermediate bakers. Add wonky chimneys, patchwork roofs, and garden elements like gnomes or flying cars. Pros: Imperfections add character. Cons: Balancing asymmetry takes practice. Great for families who love the warmth of the Weasley family.
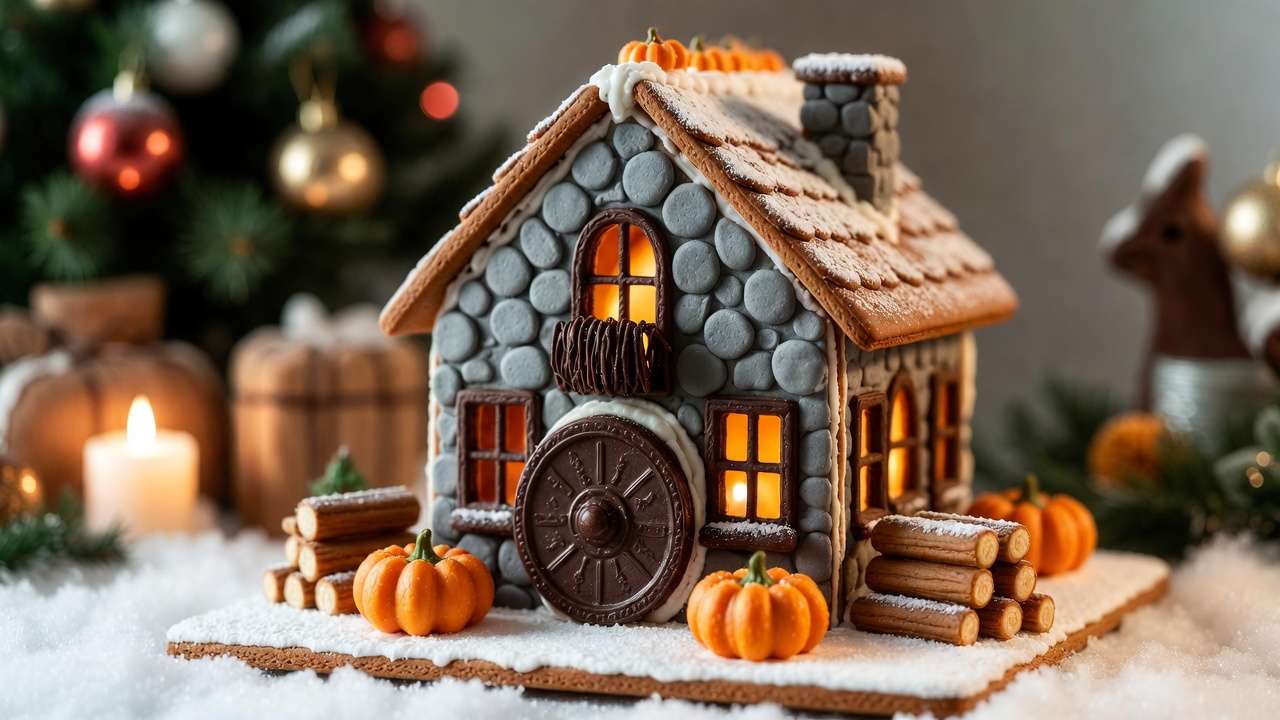
Hagrid’s Hut
A rustic, rounded-roof cottage with stone walls, a large door, and pumpkin patches. Beginner-friendly due to simpler shapes and fewer pieces. Pros: Quick assembly, forgiving design. Cons: Less “wow” factor than Hogwarts. Ideal for first-timers or kid-led projects.
Other Fun Ideas
- Platform 9¾ train station with a scarlet Hogwarts Express engine.
- Diagon Alley shopfront (e.g., Flourish and Blotts or Ollivanders).
- Mini Forbidden Forest scene with tree cookies and creature details.
Consider your space, timeline, and enthusiasm: Start small if you’re new, or scale up for Potter superfans.
Ingredients & Equipment You’ll Need
Success starts with the right foundation. Use high-quality ingredients for flavor and strength.
Best Gingerbread Dough Recipe for Sturdy Structures (makes enough for one medium house + decorations; double for larger builds)
This construction-grade recipe prioritizes stability over softness—dense, no-spread dough that holds intricate cuts and heavy decorations. It’s fully edible, with bold spices evoking holiday magic.
Ingredients (imperial/metric):
- 1 cup (226g) unsalted butter, softened
- 1 cup (200g) dark brown sugar, packed
- 1 cup (340g) molasses or dark corn syrup (for pliability when warm)
- 2 large eggs
- 6 cups (750g) all-purpose flour
- 2 tsp ground cinnamon
- 2 tsp ground ginger (increase to 3–4 Tbsp for extra “magical” spice)
- 1 tsp ground cloves
- 1 tsp ground nutmeg
- 1 tsp baking soda
- ½ tsp salt
Instructions: Cream butter and sugar, beat in molasses and eggs. Whisk dry ingredients, mix in gradually. Chill dough 2+ hours (or overnight) before rolling.
 Royal Icing Recipe – The Magical “Glue”
Use this for assembly and decorating—stiff for structure, flood-consistency for smooth areas.
- 4 cups (480g) confectioners’ sugar, sifted
- 3 Tbsp meringue powder (or 3 fresh egg whites for traditional)
- ½–¾ cup warm water
- 1 tsp vanilla extract or lemon juice
- Gel food colors: red, gold, green, silver, black, etc.
Beat on low to combine, then high for 7–10 minutes until stiff peaks form. Thin with water for flooding.
Essential Tools & Decorations
- Rolling pin, parchment paper, sharp knife or pizza cutter
- Piping bags + tips (round #2–4, star, leaf)
- Cardstock for templates (print and cut)
- Candy: pretzel sticks (wands/brooms), chocolate coins (Galleons), gummy bears (Bertie Bott’s), ice cream cones (trees), shredded coconut (snow), edible glitter
- Supports: canned goods for propping during drying
Printable Templates
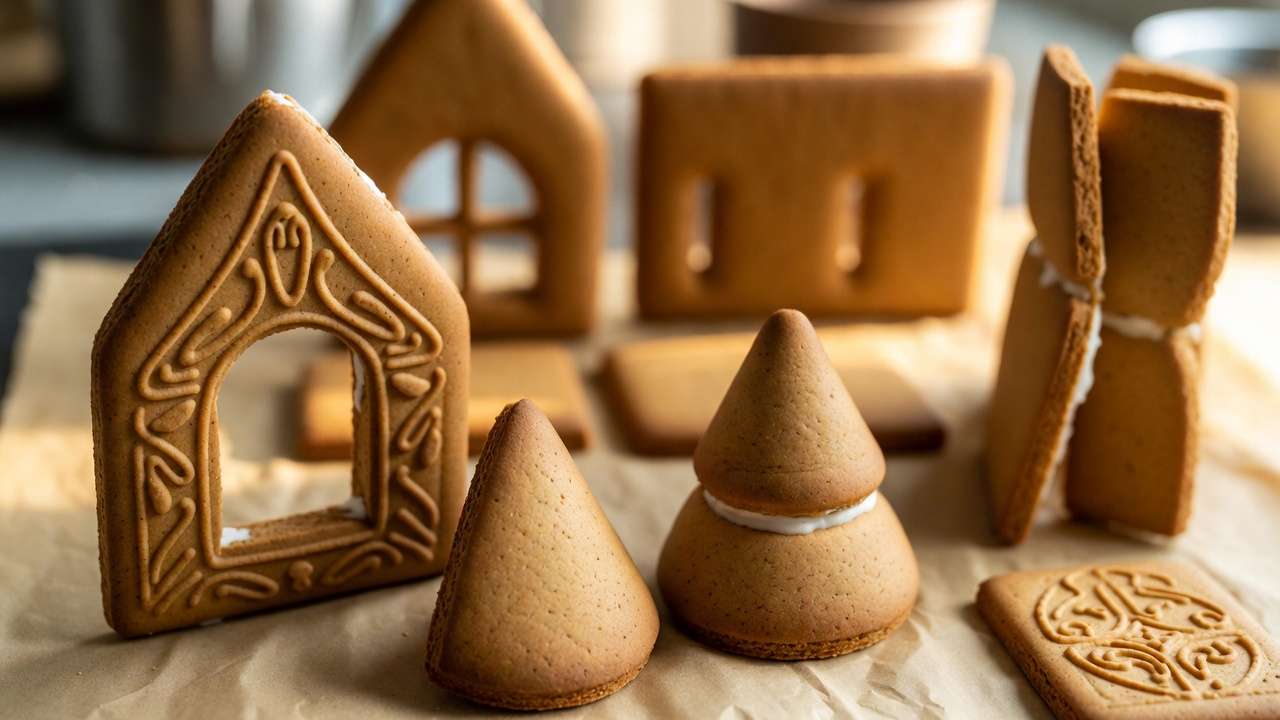
Create your own by sketching or scaling from references: Basic house base (two side walls 8×6 inches, front/back 10×8 with gables, roof panels). Add Potter details like arched windows, tower cones, Burrow layers, or Hagrid’s round door. Print on cardstock, cut, and trace onto dough.
Step-by-Step Construction Guide
This is the heart of the project—where your Harry Potter gingerbread house comes to life. Follow these steps carefully, and allow ample drying time between phases. Patience is the true magic here; rushing leads to the most common collapses.
 Preparing & Baking the Gingerbread Pieces
-
Chill the dough thoroughly. After mixing, divide into 2–3 discs, wrap tightly in plastic, and refrigerate for at least 2 hours (overnight is best). Cold dough prevents spreading and makes clean cuts easier.
-
Roll out the dough. Work on parchment paper lightly dusted with flour. Roll to an even ¼-inch (6 mm) thickness—use chopsticks or wooden dowels as thickness guides on either side of the rolling pin. Thicker pieces = stronger structure.
-
Cut using templates. Place your printed cardstock templates on the dough and trace with a sharp paring knife or pizza cutter. For intricate details (arched windows, tower cones, Burrow chimneys), use a small offset spatula to lift and reposition pieces if needed. Cut all pieces at once—front/back walls, side walls, roof panels, decorative elements (snitches, owls, banners).
Pro tip: Cut extras of every piece. Breakage happens, and spares save heartbreak.
-
Transfer to baking sheets. Slide the parchment directly onto cookie sheets. If pieces warp slightly during transfer, gently reshape while still soft.
-
Bake low and slow. Preheat oven to 350°F (175°C). Bake 12–18 minutes, rotating sheets halfway. Edges should be firm and lightly browned; centers may still look soft—they firm up as they cool. Overbaking makes dough too brittle; underbaking leaves it too flexible.
-
Cool completely. Let pieces cool on sheets for 5 minutes, then transfer to wire racks. Store flat in airtight containers if not assembling immediately. Baked pieces keep for weeks.
Assembling the Base Structure
This is where royal icing becomes your strongest spell.
- Prepare your base. Use a sturdy cake board, wooden plank, or foil-covered cardboard (at least 12×16 inches for most designs). Outline your footprint lightly with pencil.
- Pipe a thick bead of stiff royal icing. Use a #4 or #5 round tip. Apply along the bottom edge of one wall piece and press firmly onto the base. Hold for 30–60 seconds until it sets enough to stand.
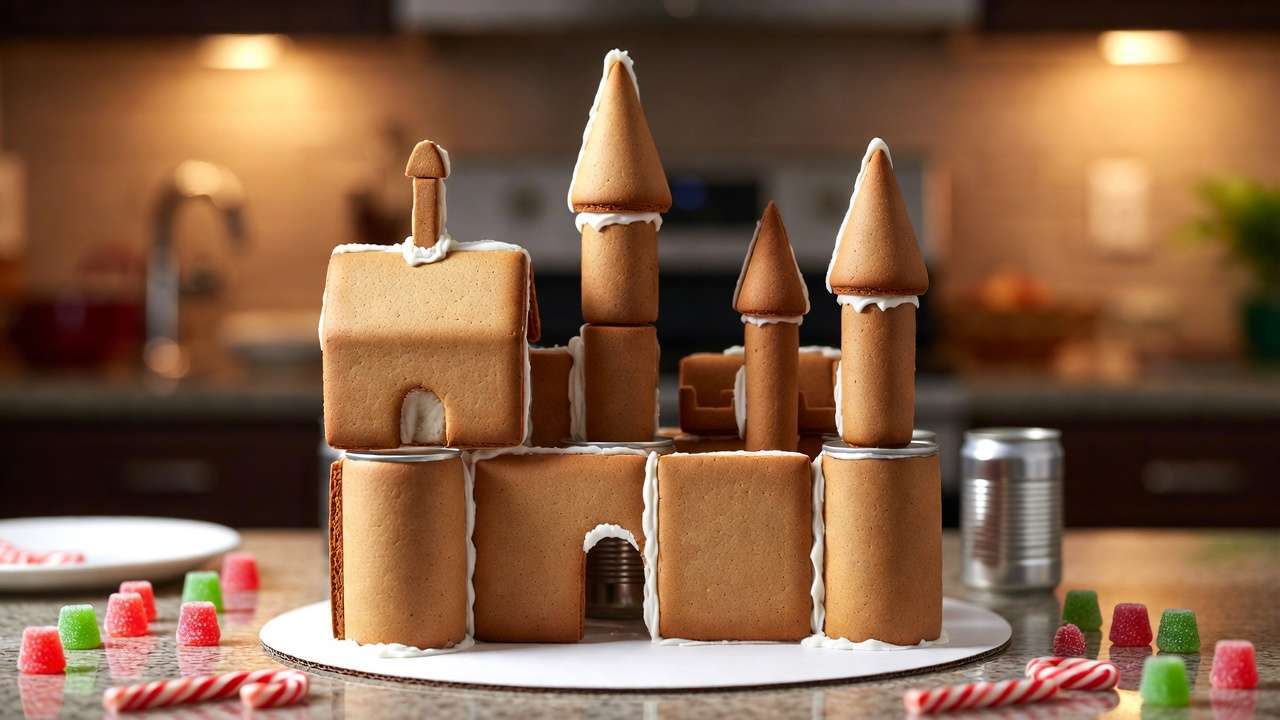
- Build in stages. Attach adjacent walls at 90° angles. Use canned goods, spice jars, or small boxes as temporary supports on both sides. Pipe generous icing along seams inside and out for reinforcement.
- Add the roof. Once walls are rock-solid (at least 4–6 hours, preferably overnight), pipe along top edges and set roof panels. For sloped roofs, prop with supports underneath until dry. Overlap roof pieces slightly for stability.
- Let it cure fully. Allow 12–24 hours of undisturbed drying in a cool, dry place before heavy decorating. This is non-negotiable for tall towers or multi-level designs like Hogwarts.
Advanced Structural Tips
- Reinforce corners and seams with extra-thick icing “beams” piped inside.
- For tall towers (Hogwarts), insert wooden skewers or thick straws coated in icing as internal supports before attaching cones.
- If a piece cracks, “glue” it back with royal icing and let dry completely—repairs are often invisible once decorated.
- Scale up safely: For larger houses, increase dough thickness to ⅜ inch and double icing quantities.
Decorating Like a True Wizard
Now the fun part—transforming sturdy walls into magical architecture.
 Piping Techniques for Authentic Details
- Brickwork and stone: Use gray royal icing (black + brown gel color) with a #2 round tip. Pipe short horizontal and vertical lines in a staggered pattern.
- Shingles: Pipe overlapping half-circles or scales with brown icing for Burrow roofs or Hogwarts towers.
- Snow and icicles: Thin white icing slightly and pipe dangling drips from eaves. Dust with edible glitter for sparkle.
- Windows and doors: Outline with black icing, then flood with translucent yellow (for candlelight glow) or blue (for moonlit scenes).
Adding Iconic Harry Potter Elements
- Golden Snitch: Pipe or mold a small ball from yellow fondant, add tiny wings from sliced almonds or piped white icing.
- Owls and broomsticks: Use pretzel sticks for brooms, pipe owl bodies on roof peaks with white icing and black eyes.
- House banners: Cut thin fondant rectangles, paint with house colors and emblems using edible dust or markers.
- Floating candles: Attach small white birthday candles (unlit!) to toothpicks, pipe dripping wax, and insert into roof.
- Pumpkin patches (Hagrid’s Hut): Roll orange fondant into mini pumpkins, add green vines with leaf tip.
- Flying Ford Anglia or gnomes: For Burrow gardens, use small candies or piped details.
House-Specific Decorating Guides
- Hogwarts Castle: Add four corner towers (cone roofs), Great Hall stained-glass windows (multi-color flooding), and a central clock tower.
- The Burrow: Embrace crookedness—lean chimneys slightly, add mismatched shingles, pipe garden gnomes peeking out.
- Hagrid’s Hut: Rough stone texture (sponge with gray icing), large round door with brass knocker (chocolate coin), surrounding pumpkins and firewood stacks.
Take your time—decorating in layers (base colors first, details last) prevents smudging.
 Tips for Beginners vs. Advanced Builders
Beginners:
- Start with Hagrid’s Hut or a simplified Burrow.
- Use a store-bought gingerbread house kit as a base and customize with Potter decorations.
- Skip intricate piping—focus on candy placement for quick wins.
- Work in short sessions to avoid fatigue.
Advanced Builders:
- Airbrush house colors for smooth gradients.
- Create multi-level scenes (e.g., Burrow with attached greenhouse).
- Incorporate LED tea lights inside for glowing windows (battery-safe).
- Build modular pieces that can be disassembled for transport.
Common Mistakes to Avoid:
- Decorating before full assembly/drying → collapse risk.
- Using runny icing for structure → weak bonds.
- Overloading with heavy candies before curing → tipping disasters.
Variations & Creative Twists
Make your project uniquely yours with these ideas:
- Mini versions — Scale templates down 50% for individual place settings or party favors.
- Gluten-free & vegan adaptations — Swap flour for GF blend (add xanthan gum), use vegan butter and aquafaba meringue for icing.
- Themed for events — Back-to-Hogwarts party centerpiece, Quidditch victory celebration, or birthday cake alternative.
- Interactive elements — Hide small chocolate frogs or notes inside before sealing the roof.
- Seasonal mash-ups — Add Christmas lights (edible string licorice) or Halloween pumpkins for year-round appeal.
Storage, Display & Safety Tips
- Display: Keep in a cool, dry spot away from heat/humidity. Avoid direct sunlight to prevent color fading.
- Storage: Cover loosely with plastic wrap or place in a large cardboard box. Most houses last 2–4 weeks as display pieces.
- Edibility: The dough and icing are safe to eat, but older structures harden significantly. Enjoy scraps or small pieces; avoid eating heavily decorated areas if displayed for weeks.
- Kid safety: Supervise young children with small candies (choking hazard). Use only food-grade materials.
 Frequently Asked Questions
How long does it take to build a Harry Potter gingerbread house? Expect 2–4 days total: 1 day for baking/cooling, 1 day for assembly/drying, 1–2 days for decorating. Rushed projects often fail.
Can I make it ahead of time? Yes—bake pieces up to 4 weeks in advance (store airtight). Assemble 1–2 weeks before display for best freshness.
What if my house collapses? Most collapses happen from insufficient drying time or weak icing. Re-attach with fresh stiff icing and reinforce seams. Prevention is easier than repair.
Where can I find free Harry Potter gingerbread house templates? Search for “printable gingerbread house templates Hogwarts” or scale basic house patterns and add details manually. (In a real blog, link to your downloadable PDFs here.)
Is this project suitable for kids? Absolutely—with supervision. Assign simple tasks like adding candies or piping snow. Start with Hagrid’s Hut for youngest builders.
How do I make the gingerbread taste better if it’s construction-grade? Increase spices (especially ginger and cinnamon) and add a touch of vanilla or orange zest. The flavor shines in thinner scraps and edges.
Can I use store-bought gingerbread dough? Yes, but homemade structural dough holds up far better under weight and humidity.
What’s the best way to get clean, sharp edges? Chill dough thoroughly, use a sharp blade, and cut just after rolling while still cold.
Congratulations—you’ve just conjured a piece of the wizarding world straight from your oven! From rolling out spiced gingerbread dough to meticulously piping every last brick, floating candle, and golden snitch, you’ve created far more than a holiday decoration. You’ve built a magical Harry Potter gingerbread house that captures the wonder, warmth, and whimsy of J.K. Rowling’s beloved series.
Whether your creation stands tall as a majestic Hogwarts Castle complete with turreted towers and glowing windows, leans charmingly askew like the beloved Burrow, or radiates cozy simplicity as Hagrid’s Hut surrounded by pumpkin patches, the real enchantment lies in the memories made along the way. The laughter shared while deciding where to place the next owl, the quiet satisfaction of watching royal icing set into unbreakable bonds, the pride when friends and family gasp at the finished masterpiece—these moments are the true spellwork.
Remember: even if a tower tilts slightly or a chimney refuses to stay perfectly straight, imperfections only add character—just like the crooked, love-filled Burrow itself. The wizarding world has never been about flawless perfection; it’s about heart, courage, and a little bit of mischief.