Imagine stepping into the Great Hall at Hogwarts: thousands of floating candles cast a warm, golden glow across the room, the tables are laden with an impossible feast, and there is a crackling energy in the air. Capturing that exact feeling of wonder for a themed party or a cozy movie marathon is the ultimate goal for any fan. But to truly impress your guests, you need more than just popcorn and pumpkin pasties; you need a show-stopping, interactive centerpiece. Enter the Harry Potter Color Changing Hot Chocolate.
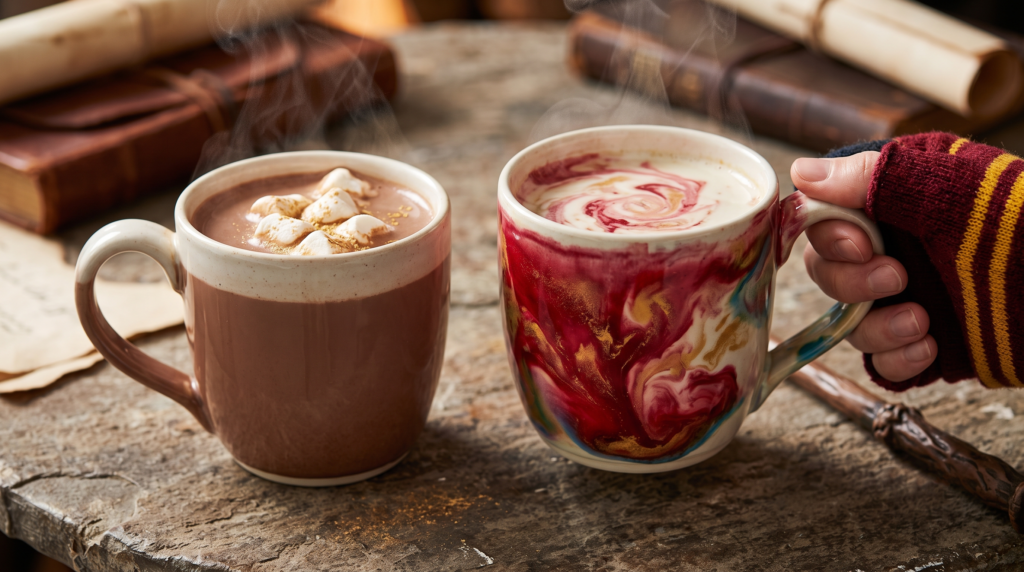
This is not just a warm beverage—it is an experience. Perfect for a “Sorting Ceremony” at a birthday party or a dramatic reveal during a cold winter night’s movie marathon, this magical drink starts as a rich, creamy white hot chocolate. But as the hot liquid is poured into the mug, it magically transforms into a vibrant crimson, emerald, sapphire, or gold, revealing the drinker’s true Hogwarts House.
As a culinary enthusiast who has tested countless variations of themed recipes, I can confidently tell you that creating this magic trick requires a bit of specific culinary science. Many recipes online result in a washed-out, pastel mess or clumpy, seized chocolate. Through rigorous testing, I have perfected this foolproof DIY recipe. In this comprehensive guide, we will dive into the “Potions” science behind the trick, the exact high-quality ingredients you need, and the step-by-step method to ensure your magical movie night goes off without a hitch.
The Secret “Potions” Science: How the Magic Works
In the wizarding world, magical transformations require precise wand movements and complex incantations. In your kitchen, the magic relies entirely on the principles of culinary camouflage and thermal dynamics. Understanding how the trick works is crucial to executing it flawlessly.
The core illusion of this color-changing drink relies on hiding a highly concentrated drop of color beneath an opaque barrier—usually a dense layer of mini marshmallows, a dollop of stabilized whipped cream, or hidden inside a hollow white chocolate “Sorting Hat” bomb. When the steaming hot liquid is poured over the barrier, the heat melts the camouflage and rapidly dissolves the concentrated color, dispersing it through the drink in a theatrical swirl.
Why White Chocolate is Non-Negotiable
For the color reveal to work, you must use a white hot chocolate base. Traditional milk or dark chocolate is inherently brown. If you try to add blue food coloring to a brown liquid, you will not get Ravenclaw blue; you will get an unappetizing, murky grey. White chocolate provides a blank canvas, allowing the food coloring to shine vibrantly.
The Pitfall of Liquid Food Coloring
One of the most common mistakes amateur potion-makers make is using standard, liquid food coloring from the grocery store baking aisle. Liquid food coloring is water-based. When you introduce water-based coloring into a fat-heavy emulsion like melted white chocolate and heavy cream, two things happen:
-
The water can cause the cocoa butter in the white chocolate to seize, creating a grainy texture.
-
Liquid colors are weak. You would need a significant amount to achieve a bold color, which dilutes the rich texture of your hot chocolate and results in a pale, pastel hue.
To achieve the deep, rich colors of the Hogwarts Houses, you must use concentrated gel food coloring. Gel colors are incredibly vibrant, requiring only a tiny drop to dye a full mug, meaning they will not alter the texture or flavor of your carefully crafted beverage.
Essential Ingredients for the White Chocolate Base
A magical reveal means nothing if the drink itself doesn’t taste extraordinary. White chocolate is notorious for being overly sweet and lacking depth. By carefully selecting your ingredients, you can elevate this from a sugary novelty drink to a gourmet, cafe-quality beverage.
High-Quality White Chocolate Bars
This is the most critical ingredient in the entire recipe. Do not use white chocolate chips. Chocolate chips are manufactured with stabilizers and emulsifiers (like soy lecithin) designed to help them hold their shape when baked in a cookie. When you try to melt them into a drinking chocolate, they often leave a waxy, granular residue that refuses to incorporate smoothly into the milk.
Instead, seek out high-quality white chocolate baking bars (brands like Lindt, Ghirardelli, or Valrhona are excellent choices). Look at the ingredient list: true white chocolate should list cocoa butter as one of the primary ingredients. Cocoa butter melts luxuriously and provides a velvety, rich mouthfeel that mimics a high-end Parisian drinking chocolate. You will need roughly 8 ounces of high-quality white chocolate for a standard batch (serving 4).
Whole Milk
For the liquid base, whole milk is highly recommended. The fat content in whole milk (around 3.25%) creates a creamy, substantial base that supports the melted chocolate. Skim or 1% milk contains too much water and will result in a thin, watery beverage that lacks the decadent body required for a true hot chocolate.
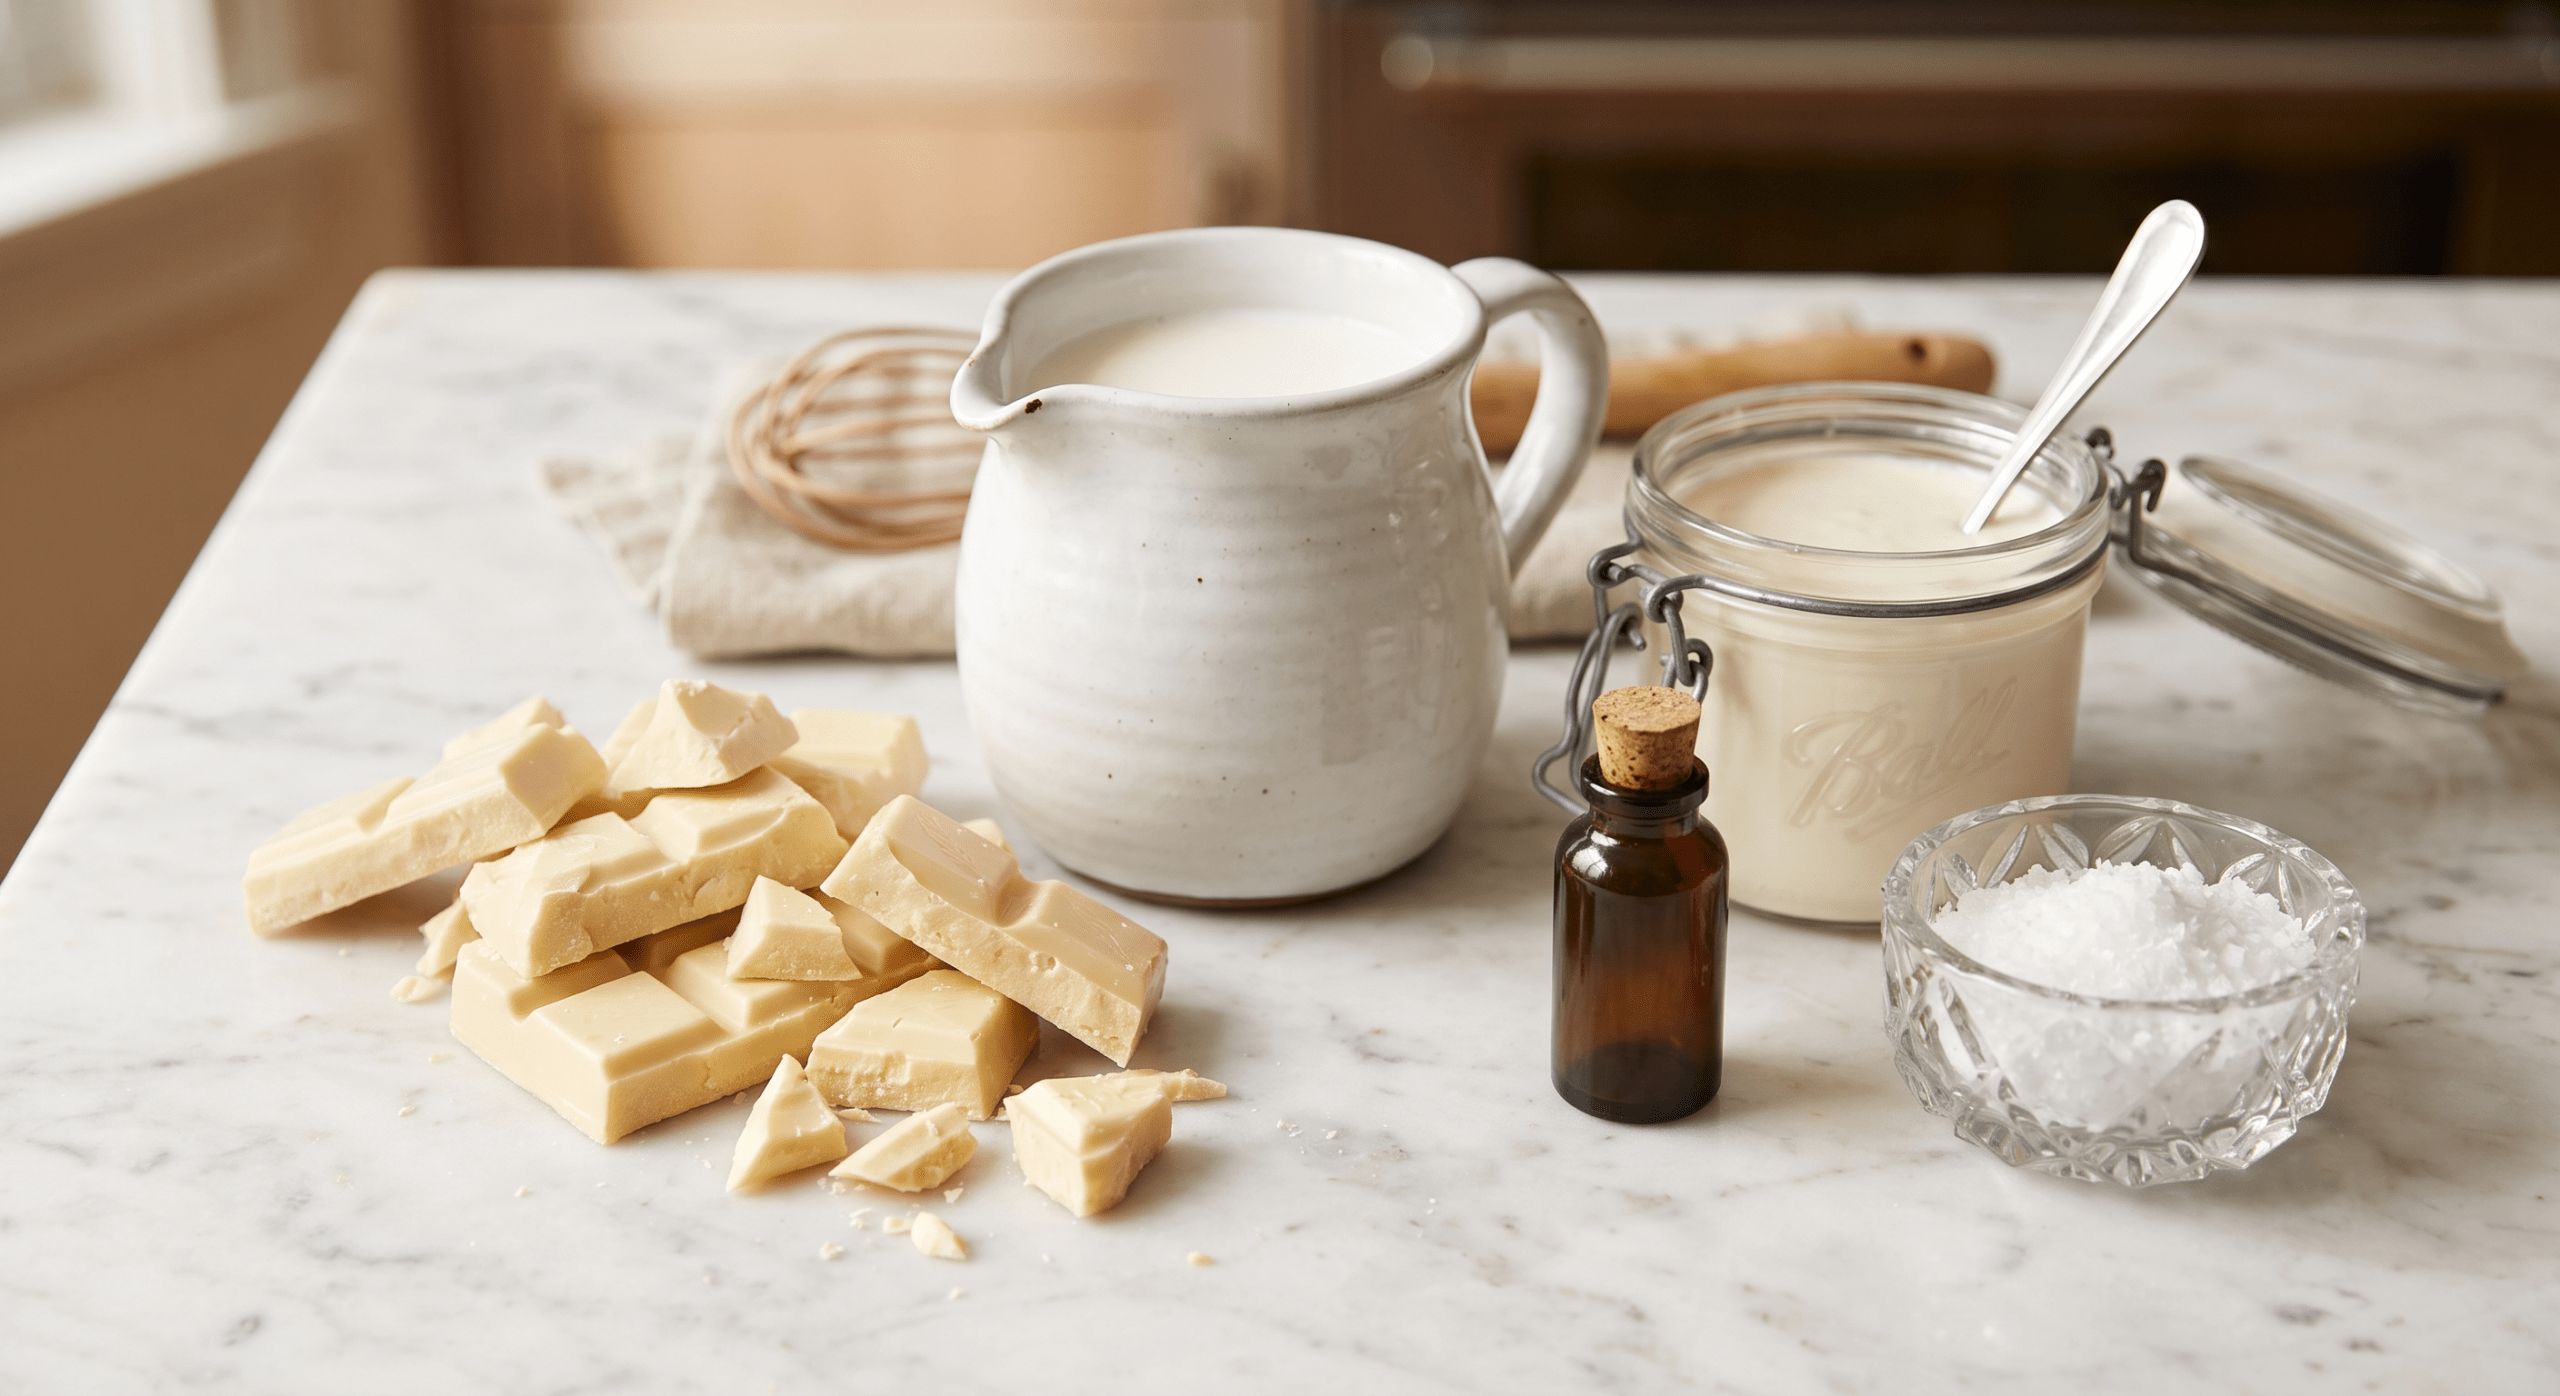 Heavy Cream
To push this recipe from “good” to “extraordinary,” we incorporate a splash of heavy cream. Adding just a half cup of heavy cream to the whole milk base enriches the emulsion, ensuring the melted cocoa butter integrates perfectly without separating.
Pure Vanilla Extract
White chocolate benefits immensely from the addition of pure vanilla extract. The floral, aromatic notes of real vanilla round out the flavor profile, making it taste complex rather than just purely sweet. Avoid imitation vanilla essence, which can leave a synthetic aftertaste.
A Pinch of Sea Salt
This is the secret weapon of professional pastry chefs. A small pinch of fine sea salt will not make the drink salty; rather, it acts as a flavor enhancer. Salt cuts through the aggressive sweetness of the white chocolate and heavy cream, balancing the beverage and making it incredibly highly drinkable.
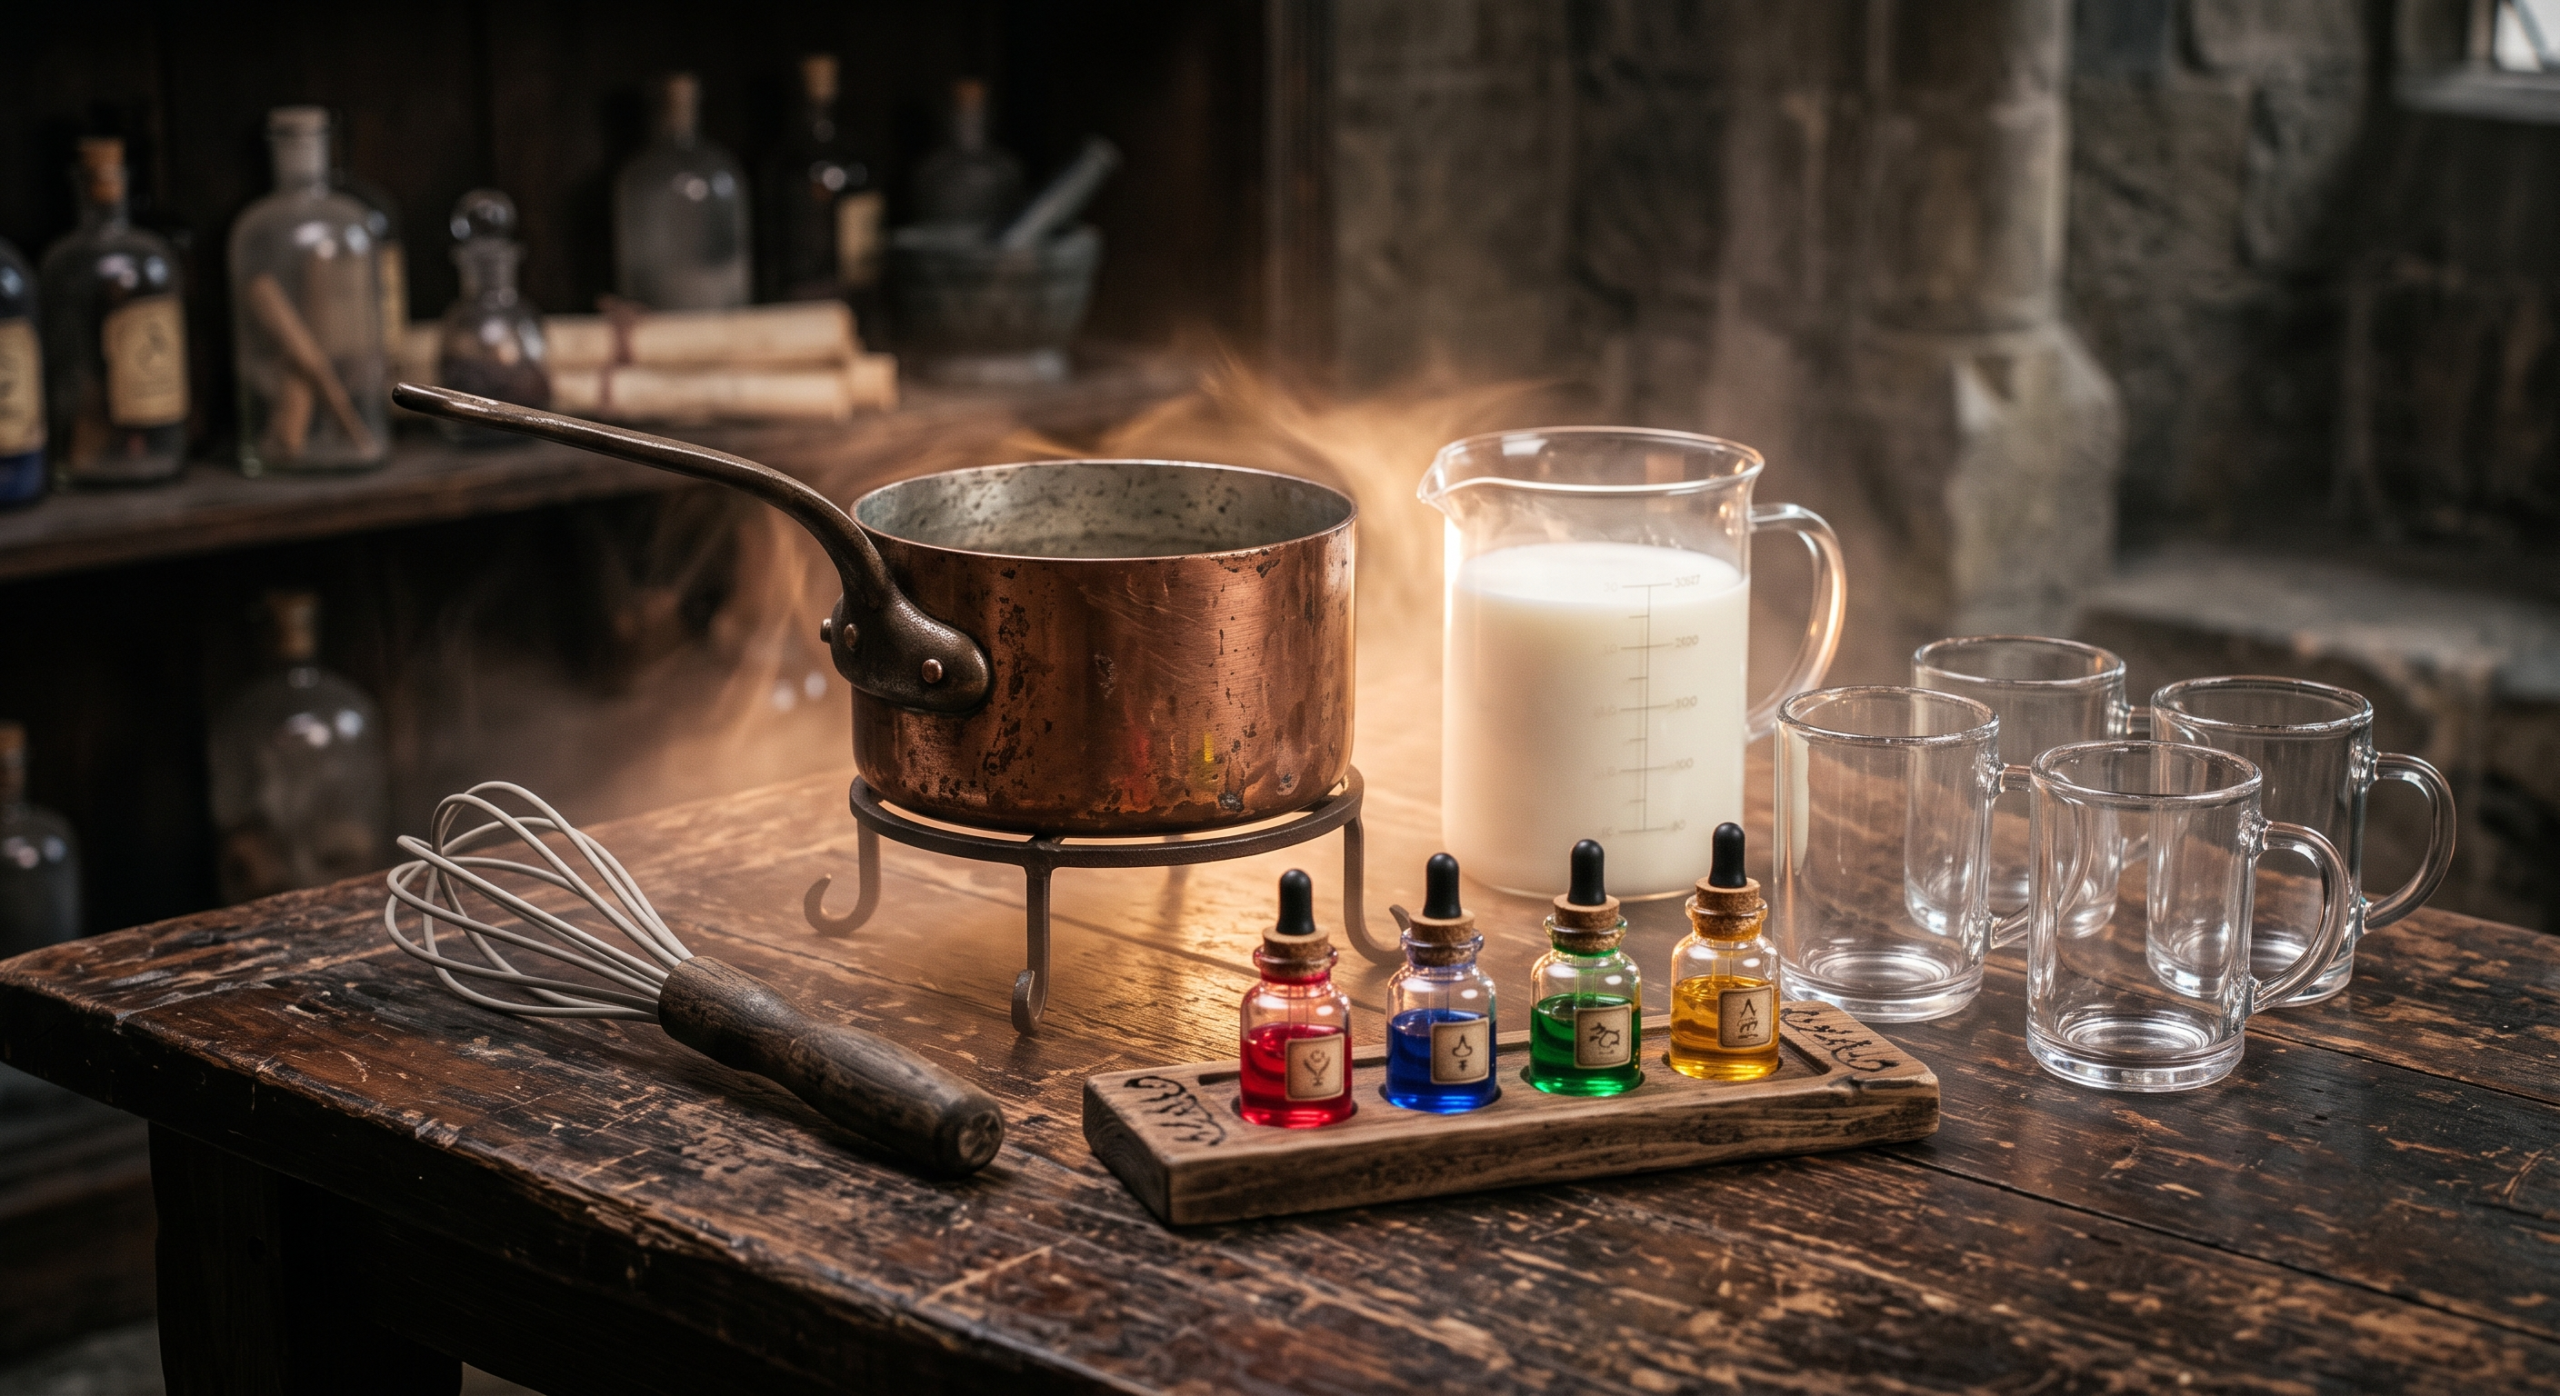
Ingredients for the “Sorting” Magic
Now that we have our gourmet base, we need to gather our magical supplies for the grand reveal.
Gel Food Coloring
As discussed in our Potions science section, gel food coloring is mandatory. You will need the four classic house colors:
-
Crimson Red (Gryffindor)
-
Emerald Green (Slytherin)
-
Deep Blue (Ravenclaw)
-
Golden Yellow (Hufflepuff)
Expert Tip: If you are hosting a large party, buy a multipack of gel colors from a baking supply store or online. A single tiny squeeze is enough for one mug, so a small bottle will easily last through multiple movie marathons.
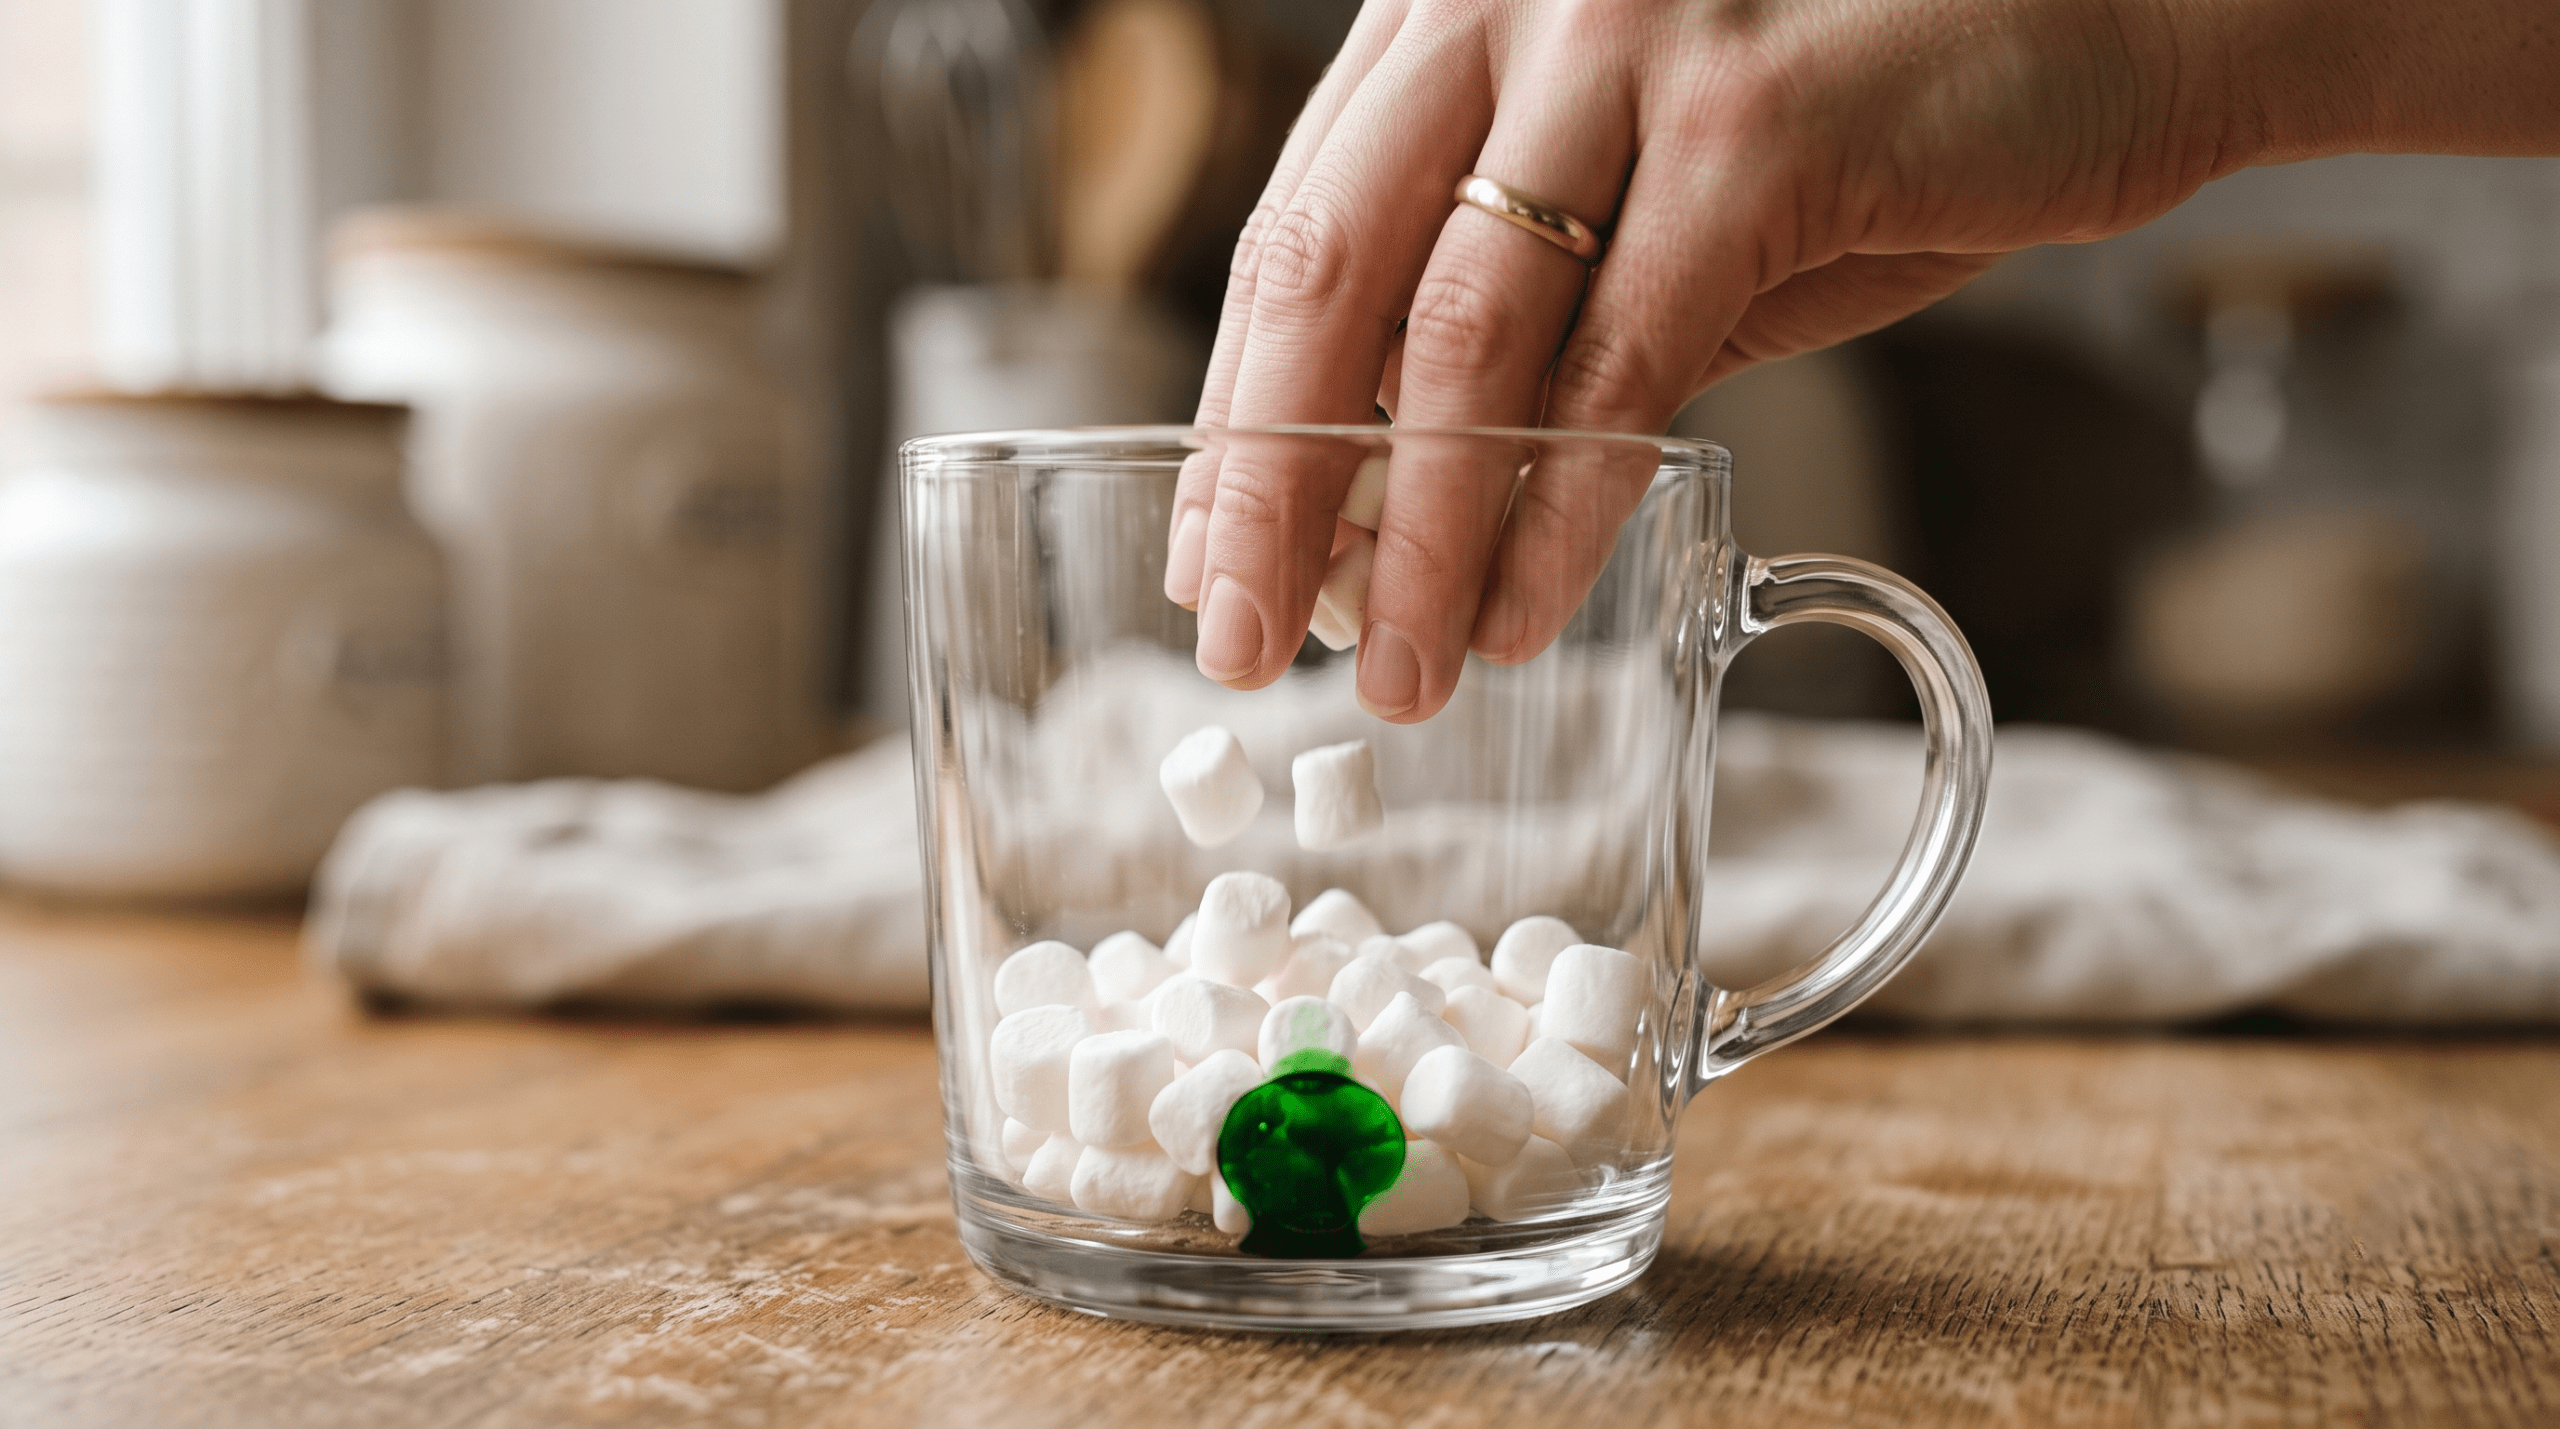
The Camouflage: Marshmallows or Whipped Cream
You need an opaque barrier to hide the gel color at the bottom of the mug.
-
Mini Marshmallows: These are the easiest and most traditional option. A generous handful of mini marshmallows packed tightly into the bottom of the mug creates an excellent barrier.
-
Homemade Whipped Cream: If you want a more elevated look, a stiff peak whipped cream piped into the bottom of the mug works beautifully. The hot liquid will melt the cream, creating a frothy, luxurious top layer while releasing the color below.
Edible Glitter or Luster Dust (Optional)
To truly make this feel like a magical elixir, consider adding a pinch of food-grade edible glitter or luster dust to the bottom of the mug alongside the gel color. When the hot chocolate is poured, the resulting colored drink will feature a mesmerizing, swirling, pearlescent shimmer that looks exactly like a potion brewed in the dungeons of Hogwarts.
Required Equipment for Potions Class
You don’t need a pewter cauldron to make this recipe, but having the right kitchen tools will make the process infinitely smoother and prevent the tragedy of scorched chocolate.
-
Heavy-Bottomed Saucepan: White chocolate is incredibly sensitive to heat and will burn quickly if exposed to direct, intense temperatures. A heavy-bottomed saucepan distributes heat evenly, preventing hot spots that can scorch your milk or seize your chocolate.
-
Silicone Whisk: A good whisk is essential for emulsifying the melting chocolate into the hot milk. A silicone whisk is preferred as it won’t scratch the bottom of your saucepan, and it easily breaks up any stubborn clumps of cocoa butter.
-
Heatproof, Clear Glass Mugs: This is crucial! The entire point of the color-changing trick is the visual reveal. If you use standard ceramic mugs, your guests will only see the color change at the very top surface. Heatproof clear glass mugs allow everyone to watch the dramatic swirl of color taking over the entire beverage from bottom to top.
-
Small Spoon, Dropper, or Toothpick: You need a precise instrument to place the gel food coloring exactly in the center of the mug without smearing it on the glass sides, which would ruin the surprise.
 Step-by-Step Recipe: Brewing the Base Potion
With your ingredients gathered and your equipment ready, it is time to brew. Treat this process with the care of an Advanced Potion-Making class. Patience and temperature control are your best friends here.
Yield: 4 servings
Prep time: 10 minutes
Cook time: 10 minutes
Step 1: Chopping the Chocolate
Begin with your 8 ounces of high-quality white chocolate baking bars. Using a sharp chef’s knife, chop the chocolate into very fine, even pieces. The smaller and more uniform the pieces, the faster and more evenly they will melt. If you leave large chunks, you risk overheating the milk while waiting for the center of the chocolate blocks to liquefy. Place the chopped chocolate into a heatproof bowl and set it aside.
Step 2: Simmering the Liquids
In your heavy-bottomed saucepan, combine 3 cups of whole milk and 1/2 cup of heavy cream. Place the saucepan over medium-low heat. Add the pinch of fine sea salt.
This is the most crucial step for avoiding a scorched potion: do not let the milk boil. You are looking for a gentle simmer, which is indicated by small bubbles forming around the very edge of the saucepan and a faint wisp of steam rising from the surface. If the milk reaches a rolling boil, the proteins can denature, leaving a film on top and a burnt flavor throughout your drink.
Step 3: The Emulsion
Once the milk and cream mixture is steaming and hot to the touch, immediately remove the saucepan from the heat source. Add your finely chopped white chocolate into the hot liquid.
Let it sit completely undisturbed for about 60 seconds. This allows the residual heat of the milk to gently begin melting the cocoa butter. After a minute, take your silicone whisk and begin to stir gently in tight circles starting from the center of the pot, gradually widening your stirring motion. The mixture will transform into a glossy, velvety, and completely smooth white hot chocolate. Stir in 1 teaspoon of pure vanilla extract at the very end.
Step 4: Setting the Trap
While the hot chocolate rests for a brief moment, prepare your clear glass mugs.
-
Take your gel food coloring and carefully squeeze exactly one or two drops into the direct center of the bottom of each mug. Be very careful not to smear the color on the sides.
-
(Optional) If you are using edible luster dust or glitter, drop a small pinch directly on top of the gel color.
-
Pack a generous handful of mini marshmallows tightly over the color drop. You want a solid, opaque layer so the person receiving the mug cannot see what is hidden beneath. Alternatively, pipe a thick, wide rosette of stiff whipped cream to completely cover the bottom of the glass.
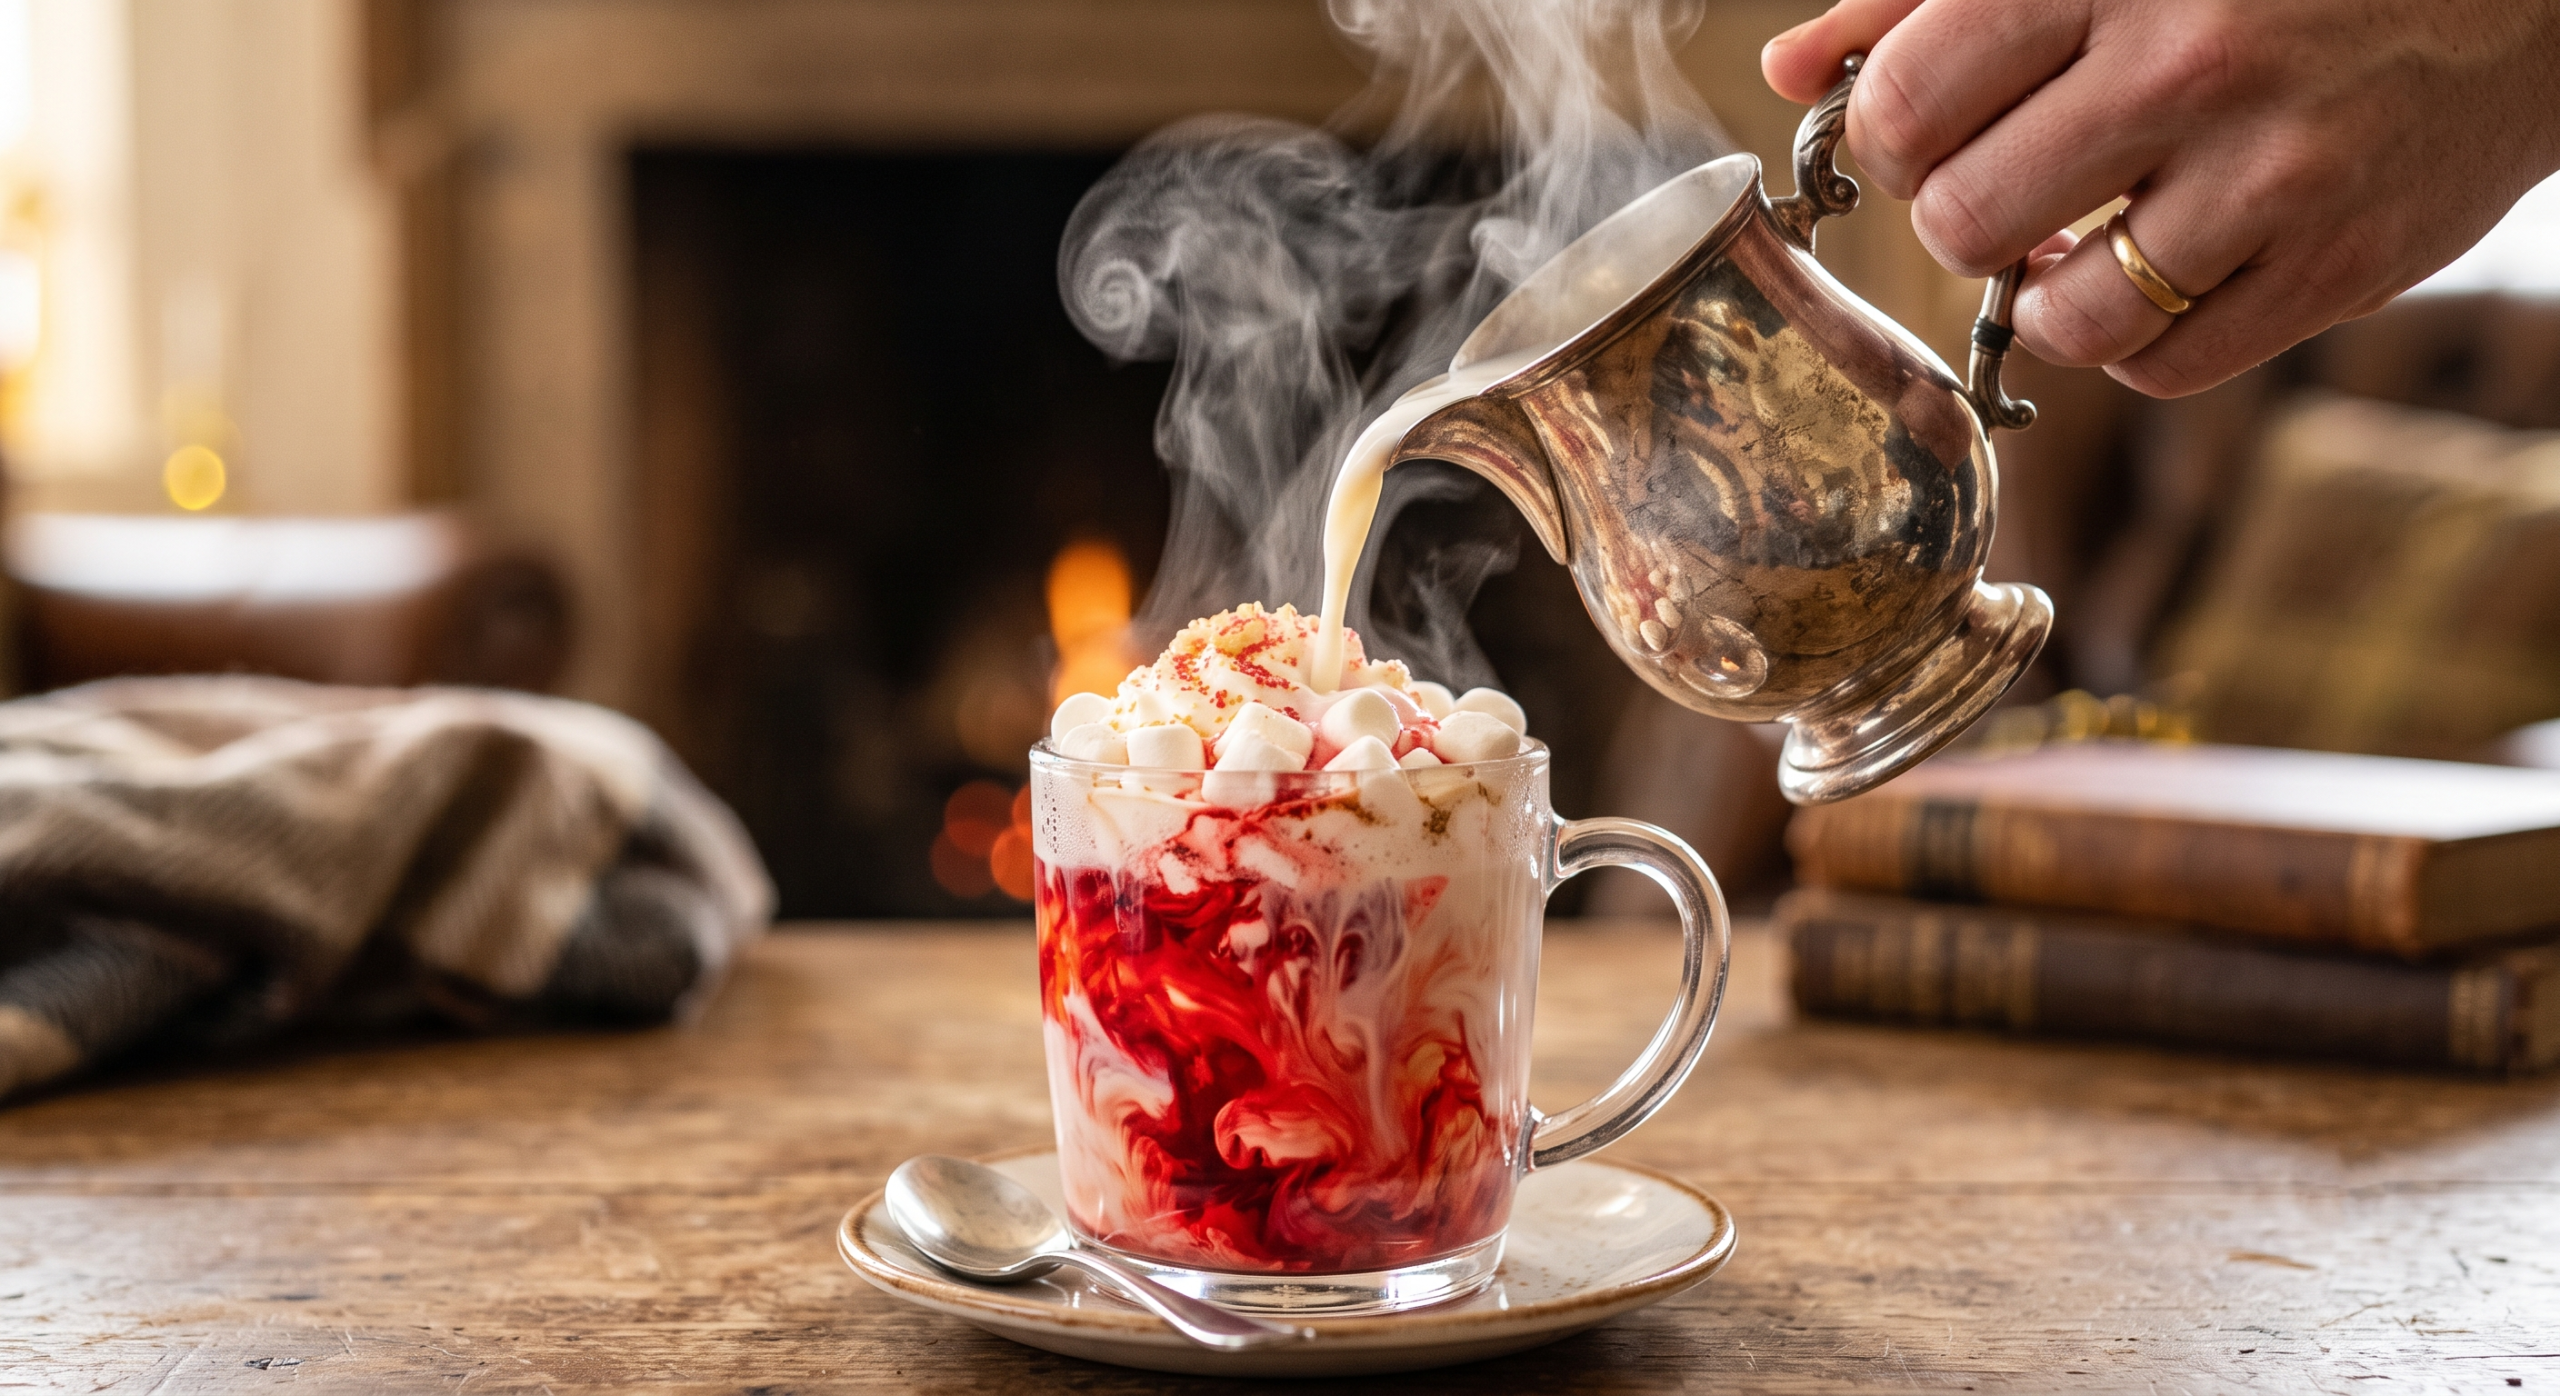
 The Grand Reveal: How to Serve It
The magic of the Harry Potter Color Changing Hot Chocolate lies entirely in the presentation. Do not pour the hot chocolate in the kitchen and carry the finished, already-colored drinks out to your guests. You must perform the “sorting” live!
Gather your guests or family members and hand them their prepared, seemingly empty mugs (with the hidden trap already set at the bottom). Bring the saucepan of steaming white hot chocolate out to the serving area.
Instruct your guests to watch closely. Slowly and steadily pour the hot liquid directly over the center of the marshmallows or whipped cream. The intense heat of the drink will immediately melt the barrier, hit the concentrated gel color, and send a brilliant, swirling plume of red, green, blue, or yellow shooting up through the white liquid. As they stir their mugs, the entire beverage will take on the brilliant hue of their newly assigned Hogwarts House.
 Customize Your Magic: The Hogwarts House Variations
To make your movie night even more spectacular, you can customize the flavor profiles and garnishes to match the traits of each Hogwarts House. If you are preparing these in advance, simply add the flavor extract to the bottom of the mug along with the gel color.
| House | Color Gel Needed | Flavor Twist Recommendation | Garnish Idea |
| Gryffindor | Crimson Red | A dash of cinnamon or cayenne for bravery | Gold luster dust and a cinnamon stick |
| Slytherin | Emerald Green | Peppermint extract for a cool, sharp bite | Shaved dark chocolate curls |
| Ravenclaw | Deep Blue | Earl grey or lavender syrup for a wise, floral note | Silver star sprinkles |
| Hufflepuff | Golden Yellow | Caramel or butterscotch syrup for ultimate comfort | Crushed graham crackers and extra marshmallows |
Pro Tips for a Flawless Harry Potter Movie Night
Hosting a themed marathon can be stressful, but your treats shouldn’t be. Here is how to guarantee a magical evening:
-
Prep the Potion Ahead of Time: You do not have to be stuck at the stove while everyone else is watching the sorting hat scene in The Sorcerer’s Stone. You can make the white hot chocolate base up to two days in advance. Store it in an airtight container in the refrigerator. When you are ready to serve, reheat it slowly on the stove over low heat, whisking constantly until steaming.
-
The “Sorting” Game: To make the experience truly authentic, do not tell anyone which mug they are receiving. Prepare the mugs in secret, shuffle them around on a serving tray, and let guests pick one at random. The color reveal will act as a genuine “Sorting Ceremony.”
-
Perfect Pairings: Because white hot chocolate is incredibly rich and decadent, pair it with treats that aren’t overwhelmingly sweet. Mini treacle tarts, simple buttery shortbread cut into the shape of magic wands, or a bowl of salty, buttered popcorn are perfect accompaniments to balance the palate.
Frequently Asked Questions (FAQs)
As an expert in themed baking and beverage creation, I hear a few common questions from readers trying to perfect this trick. Here is how to troubleshoot like a true Potions Master.
Can I make this dairy-free or vegan?
Absolutely. You can substitute the whole milk with a creamy, full-bodied alternative like oat milk or cashew milk. Skip the heavy cream or use a vegan creamer. The most important swap is the chocolate—you must find a high-quality vegan white chocolate bar (often made with rice milk and cocoa butter) that melts smoothly.
Why did my white chocolate seize or turn lumpy?
White chocolate is notoriously temperamental. If your mixture turned lumpy or grainy, one of two things happened: either the milk was too hot (which cooks the chocolate and causes it to separate into an oily, clumpy mess), or a rogue drop of water got into the bowl. Even a single drop of condensation can cause melted chocolate to seize. Always ensure your utensils are bone-dry.
Can I use cocoa powder instead of white chocolate?
No. Traditional hot cocoa is made with brown cocoa powder. If you add blue or green food coloring to a brown liquid, the colors will mix, resulting in a dark, muddy, and unappetizing color. The white chocolate base is mandatory for the colors to show up vibrantly.
Is the food coloring safe to consume in this quantity?
Yes. High-quality baking gel food coloring is entirely food-safe. Because it is highly concentrated, you are only consuming a fraction of a drop per mug, which is well within standard culinary limits and completely safe for both children and adults.
Creating a Harry Potter Color Changing Hot Chocolate is one of the easiest, yet most visually spectacular ways to bring the magic of the Wizarding World directly into your home. By utilizing the simple science of thermal melting, investing in high-quality white chocolate, and using concentrated gel colors, you elevate a standard winter drink into an unforgettable, interactive experience.
Whether you are hosting an elaborate birthday party, settling in for a weekend-long movie marathon, or simply wanting to surprise your family on a chilly evening, this DIY recipe is guaranteed to enchant.
We would love to see which house you get sorted into! Be sure to snap a video of your magical reveal and tag our blog on social media. Pin this recipe to your themed party boards for later, and subscribe to our newsletter for more pop-culture baking guides, wizarding treats, and cinematic culinary inspiration. Mischief managed!